Sunday, September 10, 2017

Three Ways to Insert CSS & Cascading Order

Three Ways to Insert CSS

There are three ways of inserting a style sheet:
  • External style sheet
  • Internal style sheet
  • Inline style

External Style Sheet

With an external style sheet, you can change the look of an entire website by changing just one file!
Each page must include a reference to the external style sheet file inside the <link> element. The <link> element goes inside the <head> section:

Example

<head>
<link rel="stylesheet" type="text/css" href="mystyle.css">
</head>
An external style sheet can be written in any text editor. The file should not contain any html tags. The style sheet file must be saved with a .css extension.
Here is how the "mystyle.css" looks:
body {
    background-color: lightblue;
}

h1 {
    color: navy;
    margin-left: 20px;
}
Note: Do not add a space between the property value and the unit (such as margin-left: 20 px;). The correct way is: margin-left: 20px;


Internal Style Sheet

An internal style sheet may be used if one single page has a unique style.
Internal styles are defined within the <style> element, inside the <head> section of an HTML page:

Example

<head>
<style>
body {
    background-color: linen;
}

h1 {
    color: maroon;
    margin-left: 40px;
}
</style>
</head>

Inline Styles

An inline style may be used to apply a unique style for a single element.
To use inline styles, add the style attribute to the relevant element. The style attribute can contain any CSS property.
The example below shows how to change the color and the left margin of a <h1> element:

Example

<h1 style="color:blue;margin-left:30px;">This is a heading</h1>
Tip: An inline style loses many of the advantages of a style sheet (by mixing content with presentation). Use this method sparingly.

Multiple Style Sheets

If some properties have been defined for the same selector (element) in different style sheets, the value from the last read style sheet will be used.

Example

Assume that an external style sheet has the following style for the <h1> element:
h1 {
    color: navy;
}
then, assume that an internal style sheet also has the following style for the <h1> element:
h1 {
    color: orange;   
}
If the internal style is defined after the link to the external style sheet, the <h1> elements will be "orange":

Example

<head>
<link rel="stylesheet" type="text/css" href="mystyle.css">
<style>
h1 {
    color: orange;
}
</style>
</head>
However, if the internal style is defined before the link to the external style sheet, the <h1> elements will be "navy":

Example

<head>
<style>
h1 {
    color: orange;
}
</style>
<link rel="stylesheet" type="text/css" href="mystyle.css">
</head>

Cascading Order

What style will be used when there is more than one style specified for an HTML element?
Generally speaking we can say that all the styles will "thác nước" into a new "virtual" style sheet by the following rules, where number one has the highest priority:
  1. Inline style (inside an HTML element)
  2. External and internal style sheets (in the head section)
  3. Browser default
So, an inline style (inside a specific HTML element) has the highest priority, which means that it will override a style defined inside the <head> tag, or in an external style sheet, or a browser default value.

/* Css comment */


Comments are used to explain the code, and may help when you edit the source code at a later date.
Comments are ignored by browsers.
A CSS comment starts with /* and ends with */. Comments can also span multiple lines:

Example

p {
    color: red;
    /* This is a single-line comment */
    text-align: center;
}

/* This is
a multi-line
comment */

CSS Syntax and Selectors

CSS Syntax

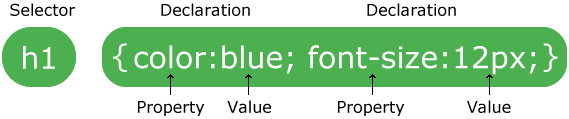
A CSS rule-set consists of a selector and a declaration block:
CSS selector
The selector points to the HTML element you want to style.
The declaration block contains one or more declarations separated by semicolons.
Each declaration includes a CSS property name and a value, separated by a colon.
A CSS declaration always ends with a semicolon, and declaration blocks are surrounded by curly braces.
In the following example all <p> elements will be center-aligned, with a red text color:

Example

p {
    color: red;
    text-align: center;
}

CSS Selectors

CSS selectors are used to "find" (or select) HTML elements based on their element name, id, class, attribute, and more.

The element Selector

The element selector selects elements based on the element name.
You can select all <p> elements on a page like this (in this case, all <p> elements will be center-aligned, with a red text color):

Example

p {
    text-align: center;
    color: red;
}


The id Selector

The id selector uses the id attribute of an HTML element to select a specific element.
The id of an element should be unique within a page, so the id selector is used to select one unique element!
To select an element with a specific id, write a hash (#) character, followed by the id of the element.
The style rule below will be applied to the HTML element with id="para1":

Example

#para1 {
    text-align: center;
    color: red;
}
Note: An id name cannot start with a number!

The class Selector

The class selector selects elements with a specific class attribute.
To select elements with a specific class, write a period (.) character, followed by the name of the class.
In the example below, all HTML elements with class="center" will be red and center-aligned:

Example

.center {
    text-align: center;
    color: red;
}
You can also specify that only specific HTML elements should be affected by a class.
In the example below, only <p> elements with class="center" will be center-aligned:

Example

p.center {
    text-align: center;
    color: red;
}
HTML elements can also refer to more than one class.
In the example below, the <p> element will be styled according to class="center" and to class="large":

Example

<p class="center large">This paragraph refers to two classes.</p>
Note: A class name cannot start with a number!

Grouping Selectors

If you have elements with the same style definitions, like this:
h1 {
    text-align: center;
    color: red;
}

h2 {
    text-align: center;
    color: red;
}

p {
    text-align: center;
    color: red;
}
It will be better to group the selectors, to minimize the code.
To group selectors, separate each selector with a comma.
In the example below we have grouped the selectors from the code above:

Example

h1, h2, p {
    text-align: center;
    color: red;
}

CSS Introduction

What is CSS?

  • CSS stands for Cascading Style Sheets
  • CSS describes how HTML elements are to be displayed on screen, paper, or in other media
  • CSS saves a lot of work. It can control the layout of multiple web pages all at once
  • External stylesheets are stored in CSS files

CSS Demo - One HTML Page - Multiple Styles!

Here we will show one HTML page displayed with four different stylesheets. Click on the "Stylesheet 1", "Stylesheet 2", "Stylesheet 3", "Stylesheet 4" links below to see the different styles:


Why Use CSS?

CSS is used to define styles for your web pages, including the design, layout and variations in display for different devices and screen sizes.

CSS Solved a Big Problem

HTML was NEVER intended to contain tags for formatting a web page!
HTML was created to describe the content of a web page, like:
<h1>This is a heading</h1>
<p>This is a paragraph.</p>
When tags like <font>, and color attributes were added to the HTML 3.2 specification, it started a nightmare for web developers. Development of large websites, where fonts and color information were added to every single page, became a long and expensive process.
To solve this problem, the World Wide Web Consortium (W3C) created CSS.
CSS removed the style formatting from the HTML page!

CSS Saves a Lot of Work!

The style definitions are normally saved in external .css files.
With an external stylesheet file, you can change the look of an entire website by changing just one file!

Saturday, September 9, 2017

Layout với div (block element) và span(inline element)

Every HTML element has a default display value depending on what type of element it is. The default display value for most elements is block or inline.

Block-level Elements

A block-level element always starts on a new line and takes up the full width available (trải dài ra to the left and right as far as it can).
The <div> element is a block-level element.
Examples of block-level elements:
  • <div>
  • <h1> - <h6>
  • <p>
  • <form>

Inline Elements

An inline element does not start on a new line and only takes up as much width as necessary.
This is an inline <span> element inside a paragraph.
Examples of inline elements:
  • <span>
  • <a>
  • <img>

The <div> Element

The <div> element is often used as a container for other HTML elements.
The <div> element has no required attributes, but both style and class are common.
When used together with CSS, the <div> element can be used to style blocks of content:

Example

<div style="background-color:black;color:white;padding:20px;">
  <h2>London</h2>
  <p>London is the capital city of England. It is the most populous city in the United Kingdom, with a metropolitan area of over 13 million inhabitants.</p>
</div>

The <span> Element

The <span> element is often used as a container for some text.
The <span> element has no required attributes, but both style and class are common.
When used together with CSS, the <span> element can be used to style parts of the text:

Example

<h1>My <span style="color:red">Important</span> Heading</h1>

Tạo menu với css và unorder list ul

HTML lists can be styled in many different ways with CSS.
One popular way is to style a list horizontally, to create a menu:

Ví dụ 1:


<!DOCTYPE html>
<html>
<head>
<style>
ul#menu {
    list-style-type: none;
    margin: 0;
    padding: 0;
}

ul#menu li {
    float:left;
}
</style>
</head>
<body>

<ul id="menu">
  <li>Apples</li>
  <li>Bananas</li>
  <li>Lemons</li>
  <li>Oranges</li>
</ul> 

</body>
</html>

Ví dụ 2:


<!DOCTYPE html>
<html>
<head>
<style>
ul {
    list-style-type: none;
    margin: 0;
    padding: 0;
    overflow: hidden;
    background-color: #888888;
}

li {
    float: left;
}

li a {
    display: block;
    color: white;
    text-align: center;
    padding: 16px;
    text-decoration: none;
}

li a:hover {
    background-color: #111111;
}
</style>
</head>
<body>

<ul>
  <li><a href="#home">Home</a></li>
  <li><a href="#news">News</a></li>
  <li><a href="#contact">Contact</a></li>
  <li><a href="#about">About</a></li>
</ul>

</body>
</html>

HTML Styles - CSS


CSS = Styles and Colors

Manipulate Text
Colors,  Boxes


Styling HTML with CSS

CSS stands for Cascading Style Sheets.
CSS describes how HTML elements are to be displayed on screen, paper, or in other media.
CSS saves a lot of work. It can control the layout of multiple web pages all at once.
CSS can be added to HTML elements in 3 ways:
  • Inline - by using the style attribute in HTML elements
  • Internal - by using a <style> element in the <head> section
  • External - by using an external CSS file
The most common way to add CSS, is to keep the styles in separate CSS files. However, here we will use inline and internal styling, because this is easier to demonstrate, and easier for you to try it yourself.
Tip: You can learn much more about CSS in our CSS Tutorial.

Inline CSS

An inline CSS is used to apply a unique style to a single HTML element.
An inline CSS uses the style attribute of an HTML element.
This example sets the text color of the <h1> element to blue:

Example

<h1 style="color:blue;">This is a Blue Heading</h1>


Internal CSS

An internal CSS is used to define a style for a single HTML page.
An internal CSS is defined in the <head> section of an HTML page, within a <style> element:

Example

<!DOCTYPE html>
<html>
<head>
<style>
body {background-color: powderblue;}
h1   {color: blue;}
p    {color: red;}
</style>
</head>
<body>

<h1>This is a heading</h1>
<p>This is a paragraph.</p>

</body>
</html>

External CSS

An external style sheet is used to define the style for many HTML pages.
With an external style sheet, you can change the look of an entire web site, by changing one file!
To use an external style sheet, add a link to it in the <head> section of the HTML page:

Example

<!DOCTYPE html>
<html>
<head>
  <link rel="stylesheet" href="styles.css">
</head>
<body>

<h1>This is a heading</h1>
<p>This is a paragraph.</p>

</body>
</html>
An external style sheet can be written in any text editor. The file must not contain any HTML code, and must be saved with a .css extension.
Here is how the "styles.css" looks:
body {
    background-color: powderblue;
}
h1 {
    color: blue;
}
p {
    color: red;
}

CSS Fonts

The CSS color property defines the text color to be used.
The CSS font-family property defines the font to be used.
The CSS font-size property defines the text size to be used.

Example

<!DOCTYPE html>
<html>
<head>
<style>
h1 {
    color: blue;
    font-family: verdana;
    font-size: 300%;
}
p  {
    color: red;
    font-family: courier;
    font-size: 160%;
}
</style>
</head>
<body>

<h1>This is a heading</h1>
<p>This is a paragraph.</p>

</body>
</html>

CSS Border

The CSS border property defines a border around an HTML element:

Example

p {
    border: 1px solid powderblue;
}

CSS Padding

The CSS padding property defines a padding (space) between the text and the border:

Example

p {
    border: 1px solid powderblue;
    padding: 30px;
}

CSS Margin

The CSS margin property defines a margin (space) outside the border:

Example

p {
    border: 1px solid powderblue;
    margin: 50px;
}

The id Attribute

To define a specific style for one special element, add an id attribute to the element:
<p id="p01">I am different</p>
then define a style for the element with the specific id:

Example

#p01 {
    color: blue;
}
Note: The id of an element should be unique within a page, so the id selector is used to select one unique element!

The class Attribute

To define a style for a special type of elements, add a class attribute to the element:
<p class="error">I am different</p>
then define a style for the elements with the specific class:

Example

p.error {
    color: red;
}

External References

External style sheets can be referenced with a full URL or with a path relative to the current web page.
This example uses a full URL to link to a style sheet:

Example

<link rel="stylesheet" href="https://www.w3schools.com/html/styles.css">
This example links to a style sheet located in the html folder on the current web site:

Example

<link rel="stylesheet" href="/html/styles.css">
This example links to a style sheet located in the same folder as the current page:

Example

<link rel="stylesheet" href="styles.css">
You can read more about file paths in the chapter HTML File Paths.

Chapter Summary

  • Use the HTML style attribute for inline styling
  • Use the HTML <style> element to define internal CSS
  • Use the HTML <link> element to refer to an external CSS file
  • Use the HTML <head> element to store <style> and <link> elements
  • Use the CSS color property for text colors
  • Use the CSS font-family property for text fonts
  • Use the CSS font-size property for text sizes
  • Use the CSS border property for borders
  • Use the CSS padding property for space inside the border
  • Use the CSS margin property for space outside the border